Title here
Summary here
我们提供了多个版本的工程,本文只列出可用的工程,以及如何下载。
如果您对这些工程的移植过程感兴趣,可以参考移植教程中的对应内容。
ESP32,Linux平台因为篇幅过长,所以放到了单独的章节中。
我们会在下个章节中讨论工程的编译及配置问题。
😋 我们正在开发中,包括但不限于如下工程:
该版本完全基于官方 Pico C-SDK 开发,仅添加了LVGL的支持,所以如果您想要在本项目基础上进行原生二次开发,可以选择该裸机工程。
仓库链接:https://gitee.com/embeddedboys/pico_dm_qd3503728_noos
国内用户:
git clone https://gitee.com/embeddedboys/pico_dm_qd3503728_noos国外用户:
git clone https://github.com/embeddedboys/pico_dm_qd3503728_noos我们将在现有工程基础上(裸机或者FreeRTOS工程),添加 USB 显示屏 的支持,这将达到如下目标:
在 Linux 机器上,通过USB线连接到本设备,将创建一个新的fb设备
在 Windows 机器上,通过USB线连接到本设备,将识别到一个新的显示器
上述两种方式都为当前的Host机器提供了主/拓展显示器支持。
下面这张图片是在 Raspberry Pi 上运行的效果:
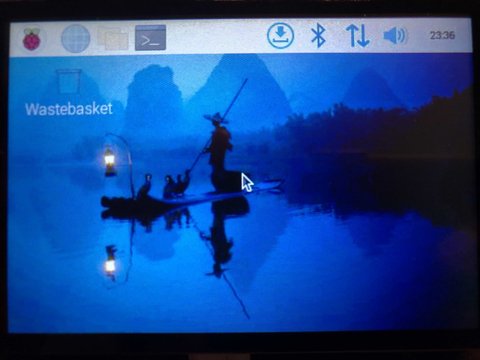
工程还在开发中,目前还不支持触摸上报,您可以到如下仓库链接查看最新开发进度:
仓库链接:https://gitee.com/embeddedboys/pico_dm_qd3503728_udd
有关编译、烧录及使用的说明,请先查看上述仓库的 README 文件。
国内用户
git clone https://gitee.com/embeddedboys/pico_dm_qd3503728_udd国外用户:
git clone https://github.com/embeddedboys/pico_dm_qd3503728_udd如果使用局部刷新的话,那么在发送像素数据前,需要给屏幕驱动发送额外的命令来设置绘制的窗口,
从而降低了一定的刷新效率,而且我们的 8080 PIO 程序只支持设置 DB0 - DB15 和 WR 引脚,如果
涉及到 命令/数据 的切换写入,则需要在数据写入 PIO 前调用 gpio_put 来切换 RS 引脚以
告知屏幕驱动IC当前写入的是命令还是数据。
拓展板的分辨率为 480x320,使用 RGB565 格式,一整屏幕的像素占用 (480 x 320 x 2) = 307200 字节。 RP2350 具有 512KB 大小的 SRAM,所以我们可以在 RP2350 上启用 LVGL 的全屏刷新功能,每当 LVGL Screen 对象上有内容更新时,LVGL都会请求一次全屏刷新。
static lv_disp_drv_t disp_drv;
    ...
disp_drv.full_refresh = 1;
    ...
lv_disp_drv_register(&disp_drv);
所以,当上述全屏刷新的逻辑建立后,我们可以调整屏幕初始化的流程如下:
初始化PIO -> 发送初始化序列 -> 调整显示方向 -> 设置刷新区域为全屏 -> 设置 RS 引脚为 1(数据)
这是上述流程的代码:
static int ili9488_hw_init(struct ili9488_priv *priv)
{
    printf("initializing hardware...\n");

#if DISP_OVER_PIO
    i80_pio_init(priv->gpio.db[0], ARRAY_SIZE(priv->gpio.db), priv->gpio.wr);
#endif
    ili9488_gpio_init(priv);

    /* 发送初始化序列 */
    priv->tftops->init_display(priv);

    /* 调整显示方向 */
    priv->tftops->set_dir(priv, priv->display->rotate);

    /* clear screen to black */
    // priv->tftops->clear(priv, 0x0);

    /* 设置刷新区域为全屏 */
    priv->tftops->set_addr_win(priv, 0, 0, ILI9488_X_RES - 1, ILI9488_Y_RES - 1);

    /* 设置 RS 引脚为 1(数据) */
    gpio_put(priv->gpio.rs, 1);

    return 0;
}
然后我们的 LVGL 刷新回调函数就可以改为如下代码:
#define write_buf(p, b, l) i80_write_buf(b, l)

void ili9488_flush(lv_disp_drv_t * disp_drv, const lv_area_t * area, lv_color_t * color_p)
{
    write_buf(&g_priv, (void *)color_p, lv_area_get_size(area) * 2);

    lv_disp_flush_ready(disp_drv);
}
每当该回调函数被调用时,都会处理一个长度为 153600 的 RGB565 像素buffer,
这是一个全屏 buffer, 所以不需要设置绘制区域,全程不涉及 RS 引脚切换, 完全
由 DMA + PIO 处理,这节省了一部分 CPU 资源。
拉取代码仓库:
git clone https://github.com/embeddedboys/pico_dm_qd3503728_rp2350_lvgl_full_refresh.gitgitee 镜像待添加
Desktop / Embedded GUI development & Automation 桌面/嵌入式 GUI 开发和自动化
官方介绍:https://www.envox.eu/studio/studio-introduction/
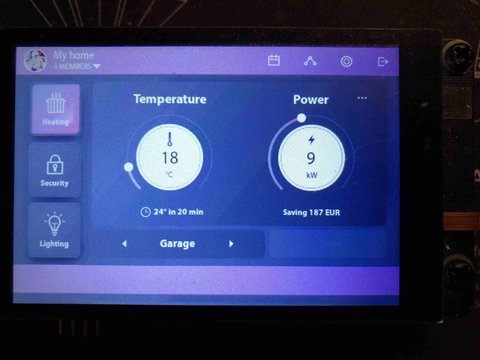
仓库链接:https://gitee.com/embeddedboys/pico_dm_qd3503728_noos_eez_studio_demo
国内用户:
git clone https://gitee.com/embeddedboys/pico_dm_qd3503728_noos_eez_studio_demo国外用户:
git clone https://github.com/embeddedboys/pico_dm_qd3503728_noos_eez_studio_demo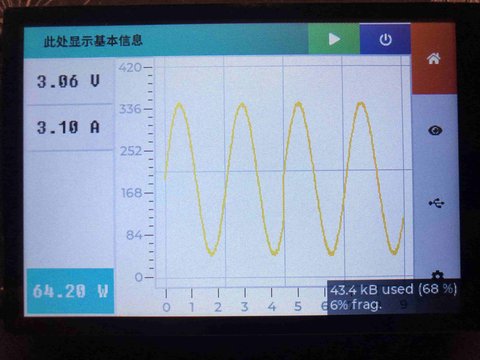
国内用户:
git clone https://gitee.com/embeddedboys/pico_dm_qd3503728_poweranylzer国外用户:
git clone https://github.com/embeddedboys/pico_dm_qd3503728_poweranylzer在开发本项目的过程中,其实我们还同时开发着其他类似项目,为了加快后续适配工作进度,我们开发了本工程,通过简单的配置就可以在多个lcd或触摸之间切换,这意味着您完全可以使用本工程在您自己的平台上开发。 😎 有关本工程的详细内容参见其readme文件。
仓库链接:https://gitee.com/embeddedboys/pico_dm_8080_template
国内用户:
git clone https://gitee.com/embeddedboys/pico_dm_8080_template国外用户:
git clone https://github.com/embeddedboys/pico_dm_8080_template如果你需要添加新的屏幕或触摸,请参考这片文章 点我跳转
与裸机版本不同的是,我们又在其基础上添加了对 FreeRTOS 的支持,同时该工程支持 SMP,可同时使用RP2040的两个核心处理任务。 如果您惯用 FreeRTOS 开发,可以选择本工程。
仓库链接:https://gitee.com/embeddedboys/pico_dm_qd3503728_freertos.git
国内用户
git clone https://gitee.com/embeddedboys/pico_dm_qd3503728_freertos.gitgit clone https://github.com/embeddedboys/pico_dm_qd3503728_freertos.git目前计划支持引脚与树莓派Pico兼容的如下开发板:
Linux 显示与触摸驱动,目前计划支持引脚与树莓派Pico兼容的如下开发板:
Luckfox PicoLuckfox Pico MaxLuckfox LyraLuckfox Lyra PlusMilk-V DuoMilk-V Duo 256M仓库链接:https://github.com/embeddedboys/lv_micropython.git
我们针对LVGL的V8.3和V9两个版本都做了适配,用户可根据需求自行选择合适的版本。
因为micropython工程涉及太多子模块,所以不方便迁移到gitee,除非在网络环境允许的情况下或您对micropython有源码修改需求,否则不建议用户自行编译。
您可以到Github Release界面直接下载我们编译好的固件直接烧录使用,位于对应Release的Assets菜单下,在对应的Release中也有介绍使用发法。 烧录方法可以参考固件烧录
对于无法访问Github的用户,可以访问如下链接下载固件:
http://embeddedboys.com/uploads/qd3503728/micropython/
为了帮助用户更快上手micropython开发,我们还录制了一个如何搭建micropython开发环境的视频,可通过访问如下链接查看:
(待添加)
先下载你需要的固件,如果您需要LVGL V8.3版本,则下载如下版本:
http://embeddedboys.com/uploads/qd3503728/micropython/v8.3/
使用firmware.uf2或其他格式固件,按照适合您的方式烧录
可以点击如下链接下载Thonny IDE http://embeddedboys.com/uploads/qd3503728/micropython/thonny-4.1.4.exe
Debian\Ubuntu用户可以执行如下命令安装Thonny IDE
bash <(wget -O - https://thonny.org/installer-for-linux)安装好Thonny后,选择工具–>选项,切换到解释器选项卡,在Thonny应该使用哪种解释器来运行您的代码?下拉菜单中找到MicroPython (Raspberry Pi Pico),并在端口或WebREPL下拉菜单选择<自动探测端口>,然后取消勾选运行代码前,先重启解释器选项。
可以使用Thonny或者MicroPico的内置功能,保存lv_utils.py到核心板文件系统中。 以Thonny为例,打开lv_utils.py文件后,选择文件–>另存为,在弹出的对话框中选择Raspberry Pi Pico,随后在弹出的文件浏览器的文件名输入框中输入lv_utils.py,然后点击确定保存。
##############################################################################
# Event Loop module: advancing tick count and scheduling lvgl task handler.
# Import after lvgl module.
# This should be imported and used by display driver.
# Display driver should first check if an event loop is already running.
#
# Usage example with SDL:
#
#        SDL.init(auto_refresh=False)
#        # Register SDL display driver.
#        # Regsiter SDL mouse driver
#        event_loop = lv_utils.event_loop()
#
#
# uasyncio example with SDL:
#
#        SDL.init(auto_refresh=False)
#        # Register SDL display driver.
#        # Regsiter SDL mouse driver
#        event_loop = lv_utils.event_loop(asynchronous=True)
#        uasyncio.Loop.run_forever()
#
# uasyncio example with ili9341:
#
#        event_loop = lv_utils.event_loop(asynchronous=True) # Optional!
#        self.disp = ili9341(asynchronous=True)
#        uasyncio.Loop.run_forever()
#
# MIT license; Copyright (c) 2021 Amir Gonnen
#
##############################################################################

import lvgl as lv
import micropython
import usys

# Try standard machine.Timer, or custom timer from lv_timer, if available

try:
    from machine import Timer
except:
    try:
        from lv_timer import Timer
    except:
        raise RuntimeError("Missing machine.Timer implementation!")

# Try to determine default timer id

default_timer_id = 0
if usys.platform == 'pyboard':
    # stm32 only supports SW timer -1
    default_timer_id = -1

if usys.platform == 'rp2':
    # rp2 only supports SW timer -1
    default_timer_id = -1

# Try importing uasyncio, if available

try:
    import uasyncio
    uasyncio_available = True
except:
    uasyncio_available = False

##############################################################################

class event_loop():

    _current_instance = None

    def __init__(self, freq=25, timer_id=default_timer_id, max_scheduled=2, refresh_cb=None, asynchronous=False, exception_sink=None):
        if self.is_running():
            raise RuntimeError("Event loop is already running!")

        if not lv.is_initialized():
            lv.init()

        event_loop._current_instance = self

        self.delay = 1000 // freq
        self.refresh_cb = refresh_cb
        self.exception_sink = exception_sink if exception_sink else self.default_exception_sink

        self.asynchronous = asynchronous
        if self.asynchronous:
            if not uasyncio_available:
                raise RuntimeError("Cannot run asynchronous event loop. uasyncio is not available!")
            self.refresh_event = uasyncio.Event()
            self.refresh_task = uasyncio.create_task(self.async_refresh())
            self.timer_task = uasyncio.create_task(self.async_timer())
        else:
            self.timer = Timer(timer_id)
            self.task_handler_ref = self.task_handler  # Allocation occurs here
            self.timer.init(mode=Timer.PERIODIC, period=self.delay, callback=self.timer_cb)
            self.max_scheduled = max_scheduled
            self.scheduled = 0

    def deinit(self):
        if self.asynchronous:
            self.refresh_task.cancel()
            self.timer_task.cancel()
        else:
            self.timer.deinit()
        event_loop._current_instance = None

    def disable(self):
        self.scheduled += self.max_scheduled

    def enable(self):
        self.scheduled -= self.max_scheduled

    @staticmethod
    def is_running():
        return event_loop._current_instance is not None

    @staticmethod
    def current_instance():
        return event_loop._current_instance

    def task_handler(self, _):
        try:
            lv.task_handler()
            if self.refresh_cb: self.refresh_cb()
            self.scheduled -= 1
        except Exception as e:
            if self.exception_sink:
                self.exception_sink(e)

    def timer_cb(self, t):
        # Can be called in Interrupt context
        # Use task_handler_ref since passing self.task_handler would cause allocation.
        lv.tick_inc(self.delay)
        if self.scheduled < self.max_scheduled:
            try:
                micropython.schedule(self.task_handler_ref, 0)
                self.scheduled += 1
            except:
                pass

    async def async_refresh(self):
        while True:
            await self.refresh_event.wait()
            self.refresh_event.clear()
            try:
                lv.task_handler()
            except Exception as e:
                if self.exception_sink:
                    self.exception_sink(e)
            if self.refresh_cb: self.refresh_cb()

    async def async_timer(self):
        while True:
            await uasyncio.sleep_ms(self.delay)
            lv.tick_inc(self.delay)
            self.refresh_event.set()


    def default_exception_sink(self, e):
        usys.print_exception(e)
event_loop.current_instance().deinit()执行ili9488_test.py,此时屏幕应有“Hello World”按钮出现,且点击按钮应有反馈。
# init
import machine

import usys as sys
sys.path.append('') # See: https://github.com/micropython/micropython/issues/6419

import lvgl as lv
import lv_utils

lv.init()

class driver:
    def __init__(self):
        machine.freq(240000000)  # set the CPU frequency to 240 MHz
        print("CPU freq : ", machine.freq() / 1000000, "MHz")

    def init_gui(self):
        import ili9488 as tft
        import ft6236 as tp

        hres = 480
        vres = 320

        # Register display driver
        event_loop = lv_utils.event_loop()
        tft.deinit()
        tft.init()
        tp.init()

        disp_buf1 = lv.disp_draw_buf_t()
        buf1_1 = tft.framebuffer(1)
        buf1_2 = tft.framebuffer(2)
        disp_buf1.init(buf1_1, buf1_2, len(buf1_1) // lv.color_t.__SIZE__)
        disp_drv = lv.disp_drv_t()
        disp_drv.init()
        disp_drv.draw_buf = disp_buf1
        disp_drv.flush_cb = tft.flush
        # disp_drv.gpu_blend_cb = tft.gpu_blend
        # disp_drv.gpu_fill_cb = tft.gpu_fill
        disp_drv.hor_res = hres
        disp_drv.ver_res = vres
        disp_drv.register()

        # Register touch sensor
        indev_drv = lv.indev_drv_t()
        indev_drv.init()
        indev_drv.type = lv.INDEV_TYPE.POINTER
        indev_drv.read_cb = tp.ts_read
        indev_drv.register()

if not lv_utils.event_loop.is_running():
    drv = driver()
    drv.init_gui()

############################################################################################

scr = lv.obj()
btn = lv.btn(scr)
btn.align(lv.ALIGN.CENTER, 0, 0)
label = lv.label(btn)
label.set_text('Hello World!')
lv.scr_load(scr)
说明
上面的py测试文件是基于LVGL V8.3版本的,V9版本的测试文件请到https://github.com/IotaHydrae/pico-py-lab/tree/main/v9下查看
您也可以使用在线模拟器来调试micropython程序
V8.3: https://sim.lvgl.io/v8.3/micropython/ports/javascript/index.html
V9.0: https://sim.lvgl.io/v9.0/micropython/ports/webassembly/index.html
可在lv_mpy_examples_v8这个仓库查看v8.3版本的lvgl micropython例子,因为v9版本较新,暂时没有例程参考。
底层驱动支持情况:
通过git或者下载zip来获取本工程
git clone https://gitee.com/embeddedboys/pico_dm_qd3503728_arduino在 Arduino IDE 中安装 pico 开发板
打开 Arduino IDE 并转到 文件->首选项。
在弹出的对话框中,在 其他开发板管理器地址 字段中输入以下 URL:
https://github.com/earlephilhower/arduino-pico/releases/download/global/package_rp2040_index.json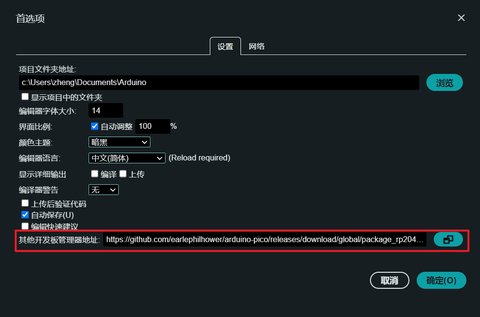
单击 确定 关闭对话框。
在 IDE 中转到 工具->开发板->开发板管理器
在搜索框中输入pico,并选择安装:

等待安装完成
通过 Arduino IDE 安装 lvgl 和 TFT_eSPI 库
将 TFT_eSPI/User_Setup.h 替换成本工程中提供的
cd pico_dm_qd3503728_arduino
cp User_Setup.h ~/Arduino/libraries/TFT_eSPI/
将 lv_conf.h 拷贝至 Arduino/libraries 目录下
cd pico_dm_qd3503728_arduino
cp lv_conf.h ~/Arduino/libraries/
如果你想要构建 lvgl 的 demos, 将 lvgl/demos
目录拷贝至 lvgl/src 目录下, examples 也一样
```bash
cd ~/Arduino/libraries/lvgl
cp demos/ -r src/
cp examples -r src/
```
这时 Arduino 目录看起来是这样的:
libraries\
    lvgl\
    TFT_eSPI\
        User_Setup.h
    lv_conf.h
(
Arduino目录在 Windows 上通常默认位于C\Users\your_username\Documents\Arduino, 在 linux 上通常位于~/Arduino)
在Arduino IDE中, 找到 File->Open 并且打开本工程中的 main/main.ino 文件
上传工程到 Pico
当你第一次上传工程时,你需要按下 Pico 的 BOOTSEL 按钮,然后插入你的电脑。此外,在你修改了工程后,你可以直接上传到你的 Pico 上。
每次上传工程时,建议选择正确的 COM 端口。
https://github.com/embedded-graphics/embedded-graphics
embedded_graphics 是一款专注于内存受限的嵌入式设备的二维图形库,基于Rust开发。 我们将从该工程基础上移植Slint。
底层驱动支持情况:
仓库链接:https://github.com/embeddedboys/pico_dm_qd3503728_embedded_graphics
国内用户
git clone https://gitee.com/embeddedboys/pico_dm_qd3503728_embedded_graphics国外用户
git clone https://github.com/embeddedboys/pico_dm_qd3503728_embedded_graphics编译烧录参考编译及配置
我们又在此基础上移植了lv_binding_rust的示例,但是该工程目前相当混乱,而且速度也不是很可观,在处理好相关问题之后我们会提供示例。 我们不建议将该工程用于实际项目中,因为相关负责人已经表示不再积极维护该项目。
我们添加了一个初步支持的slint移植,可查看如下仓库
https://github.com/embeddedboys/pico_dm_qd3503728_slint_mcu
这部分的文档还在整理中,可先查看如上仓库的 README
底层驱动支持情况:
国内用户
git clone https://gitee.com/embeddedboys/pico_dm_qd3503728_slint_mcu国外用户
git clone https://github.com/embeddedboys/pico_dm_qd3503728_slint_mcu点击查看编译及配置
Zephyr RTOS 是基于一个小型内核设计的,用于资源有限的嵌入式系统: 从简单的嵌入式环境传感器和 LED 可穿戴设备到复杂的嵌入式控制器、智能手表和物联网无线应用。
最大的特点就是用linux开发的方式来开发MCU。
https://docs.zephyrproject.org/latest/boards/raspberrypi/rpi_pico/doc/index.html
工程开发完成,整理中。。。
国内用户:
git clone https://gitee.com/embeddedboys/pico_dm_qd3503728_zephyr国外用户:
git clone https://github.com/embeddedboys/pico_dm_qd3503728_zephyrhttps://nuttx.apache.org/docs/latest/platforms/arm/rp2040/index.html
已提上日程,调研中。。。
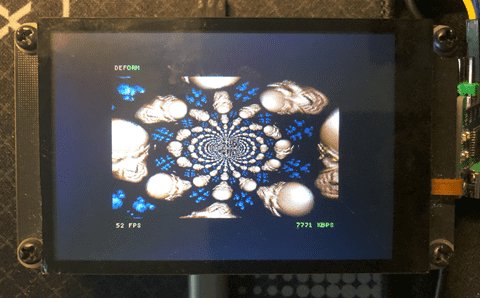
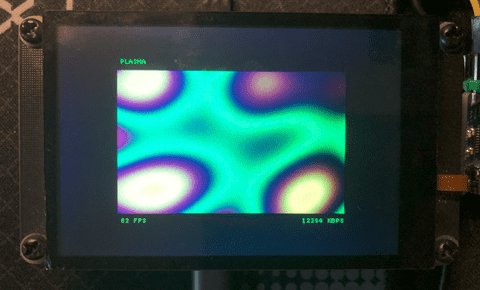
HAGL 是一个轻量级的硬件无关图形库。它支持基本几何图元、位图、位图传送、固定宽度字体。 该库试图保持轻量级,但针对功能相当强大的微芯片,例如 ESP32。没有动态分配。
hagl: https://github.com/tuupola/hagl
相关链接: https://github.com/tuupola/hagl_pico_mipi
工程开发完成,资料整理中,请先参考各仓库中的 README.md 文件
国内用户:
git clone https://gitee.com/embeddedboys/pico_dm_qd3503728_hagl_effects国外用户:
git clone https://github.com/embeddedboys/pico_dm_qd3503728_hagl_effects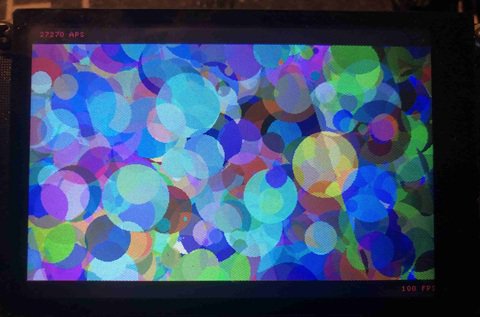
国内用户:
git clone https://gitee.com/embeddedboys/pico_dm_qd3503728_hagl_gfx国外用户:
git clone https://github.com/embeddedboys/pico_dm_qd3503728_hagl_gfxAWTK 是 Toolkit AnyWhere 的缩写,是 ZLG 开发的一个开源 GUI 引擎。 它是一个用于嵌入式系统、 WEB、迷你程序、移动电话和 PC 的跨平台 GUI 引擎。 它是一个功能强大、高效、可靠和易于使用的 GUI 引擎,为用户设计美观的 GUI 应用程序。
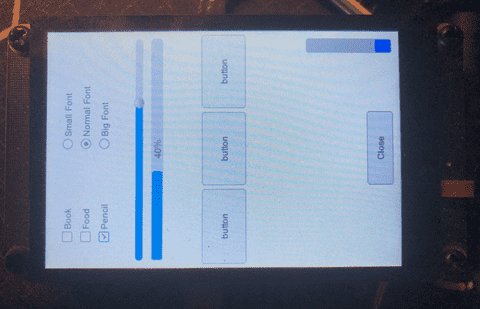
awtk: https://github.com/zlgopen/awtk
相关链接: https://github.com/zlgopen/awtk-pico https://github.com/zlgopen/awtk-previewer AWTK移植及裁剪指南.pdf
工程开发完成,资料整理中,请先参考仓库中的 README.md 文件
国内用户:
git clone https://gitee.com/embeddedboys/pico_dm_qd3503728_awtk国外用户:
git clone https://github.com/embeddedboys/pico_dm_qd3503728_awtkMicro Mac, minimalist Macintosh 128K emulator
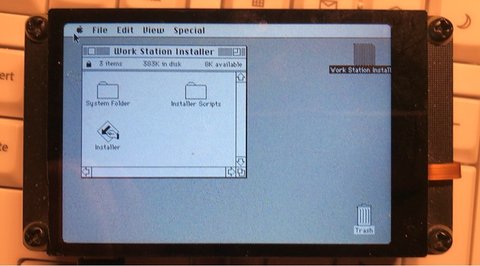
git clone https://github.com/embeddedboys/pico_dm_qd3503728_umac.git工程中,请先参考仓库中的 README.md 文件
SGL (Small Graphics Library) 是一个轻量级且快速的图形库,专为MCU级别处理器提供美观轻量的GUI(图形用户界面)。 请参考 docs 目录获取文档。
官方仓库链接:https://github.com/sgl-org/sgl
| Flash 大小 | RAM 大小 |
|---|---|
| 15KB | 3KB |
工程链接:https://github.com/embeddedboys/pico_dm_qd3503728_sgl
有关此移植的更多信息请参考工程 README 文件
git clone https://github.com/embeddedboys/pico_dm_qd3503728_sgl.git
cd pico_dm_qd3503728_sgl

git submodule update --init

mkdir -p build && cd build
cmake -DPICO_BOARD=pico2 .. -G Ninja
ninjaµGUI 是一个免费且开源的嵌入式系统图形库。它是平台无关的(platform-independent),因此可以很容易地移植到几乎任何微控制器系统上。
只要显示设备能够显示图形,µGUI 就不受特定显示技术的限制。因此,它支持多种显示技术,例如 LCD、TFT、电子纸(E-Paper)、LED 和 OLED。
整个模块由三个文件组成:ugui.c ugui.h ugui_config.h
官方仓库链接:https://github.com/achimdoebler/UGUI